API リファレンス
xrift-world-components で提供されるコンポーネント、フック、定数の一覧です。
コンポーネント
Interactable
クリック/インタラクト可能なオブジェクトを作成します。
import { Interactable } from '@xrift/world-components';

<Interactable id="my-button" onInteract={() => console.log('clicked!')}>
  <mesh>
    <boxGeometry args={[1, 1, 1]} />
    <meshStandardMaterial color="hotpink" />
  </mesh>
</Interactable>
Props
| Prop | Type | Default | Description |
|---|---|---|---|
id | string | - | 一意の識別子(必須) |
onInteract | () => void | - | インタラクト時のコールバック |
children | ReactNode | - | インタラクト対象のオブジェクト |
Mirror
リアルタイム反射面を作成します。
import { Mirror } from '@xrift/world-components';

<Mirror position={[0, 1, -5]} />
VideoScreen
同期された動画再生を行うスクリーンを作成します。
import { VideoScreen } from '@xrift/world-components';

<VideoScreen src="/videos/intro.mp4" position={[0, 2, -3]} />
VideoPlayer
VideoScreen をベースにしたUIコントロール付きのビデオプレイヤーです。再生/停止ボタン、プログレスバー、音量バーなどVR対応のコントロールUIを備えています。
import { VideoPlayer } from '@xrift/world-components';

<VideoPlayer
  id="my-video"
  url="https://example.com/video.mp4"
  position={[0, 2, -5]}
  width={4}
/>
Props
| Prop | Type | Default | Description |
|---|---|---|---|
id | string | - | スクリーンの一意なID(必須) |
position | [number, number, number] | [0, 2, -5] | スクリーンの位置 |
rotation | [number, number, number] | [0, 0, 0] | スクリーンの回転 |
width | number | 4 | スクリーンの幅(高さは16:9で自動計算) |
url | string | - | 動画のURL |
playing | boolean | true | 初期再生状態 |
volume | number | 1 | 初期音量(0〜1) |
sync | 'global' | 'local' | 'global' | 同期モード |
機能
- URL入力ボタン: 🔗 アイコンをクリックするとURL入力オーバーレイが表示され、動画ソースを動的に切り替え可能
- 再生/停止ボタン: ▶/|| アイコンで再生状態を切り替え
- プログレスバー: 20セグメントに分割された進捗バー。クリックで動画の最初に戻る
- 音量バー: 0-100%を10刻みで調整。🔈/🔇アイコンでミュート状態を表示
- VR対応:
Interactableを使用したVRコントローラー操作に対応
sync プロパティで同期モードを選択できます:
'global': 全ユーザー間で再生状態を同期(デフォルト)'local': 各ユーザーが独立して再生を制御
LiveVideoPlayer
HLS/DASH などのライブストリーミング再生に対応したビデオプレイヤーです。VideoPlayer と同様のUIコントロールを備えつつ、ライブ配信向けに最適化されています。
import { LiveVideoPlayer } from '@xrift/world-components';

<LiveVideoPlayer
  id="my-live"
  url="https://example.com/live/stream.m3u8"
  position={[0, 2, -5]}
  width={4}
/>
Props
| Prop | Type | Default | Description |
|---|---|---|---|
id | string | - | スクリーンの一意なID(必須) |
position | [number, number, number] | [0, 2, -5] | スクリーンの位置 |
rotation | [number, number, number] | [0, 0, 0] | スクリーンの回転 |
width | number | 4 | スクリーンの幅(高さは16:9で自動計算) |
url | string | - | ストリームのURL(HLS/DASH対応) |
playing | boolean | true | 初期再生状態 |
volume | number | 1 | 初期音量(0〜1) |
機能
- URL入力ボタン: 🔗 アイコンをクリックするとURL入力オーバーレイが表示され、ストリームソースを動的に切り替え可能
- 再生/停止ボタン: ▶/|| アイコンで再生状態を切り替え
- 音量バー: 0-100%を10刻みで調整。🔈/🔇アイコンでミュート状態を表示
- VR対応:
Interactableを使用したVRコントローラー操作に対応
LiveVideoPlayer はライブストリーミング向けに設計されているため、プログレスバー(シーク機能)がありません。録画済み動画の再生には VideoPlayer を使用してください。
ScreenShareDisplay
画面共有の映像を3D空間内にスクリーンとして表示します。ScreenShareContext から映像と状態を取得します。
import { ScreenShareDisplay } from '@xrift/world-components';

<ScreenShareDisplay id="screen-1" position={[0, 2, -5]} />
Props
| Prop | Type | Default | Description |
|---|---|---|---|
id | string | - | スクリーンの一意なID(必須) |
position | [number, number, number] | [0, 0, 0] | スクリーンの位置 |
rotation | [number, number, number] | [0, 0, 0] | スクリーンの回転 |
width | number | 4 | スクリーンの幅(高さは16:9で自動計算) |
映像のアスペクト比は自動的に維持されます。16:9以外の映像でも黒帯が入り正しく表示されます。
共有できる画面はワールドにつき1つまでです。ScreenShareDisplay を複数配置することは可能ですが、すべて同じ画面が表示されます。
SpawnPoint
ワールド内でプレイヤーが出現する地点を指定します。
import { SpawnPoint } from '@xrift/world-components';

<SpawnPoint />
<SpawnPoint position={[0, 0, 5]} yaw={180} />
Props
| Prop | Type | Default | Description |
|---|---|---|---|
position | [number, number, number] | [0, 0, 0] | スポーン位置 |
yaw | number | 0 | スポーン時の向き(度数法 0-360) |
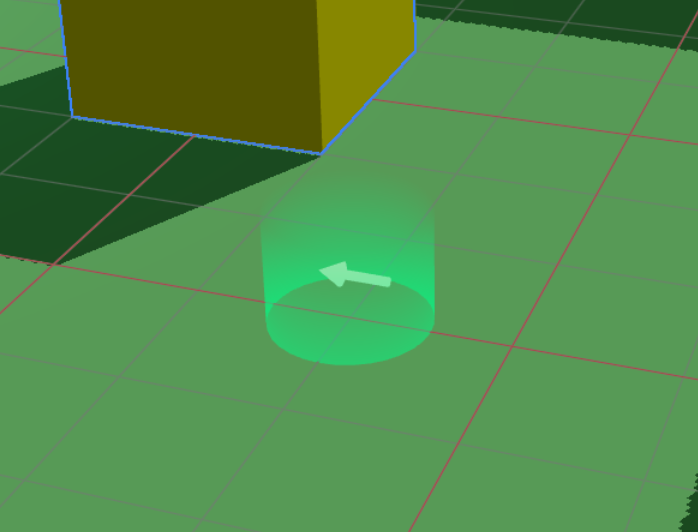
開発環境では、半透明の円柱(下から上にかけて透明度が増すグラデーション)と矢印でスポーン位置と方向を視覚化します。本番ビルドではヘルパーは表示されません。
複数の SpawnPoint を配置した場合、最後に設定されたものが有効になります。
TextInput
3D空間内でテキスト入力を可能にするコンポーネントです。children方式で外観を自由にカスタマイズできます。
import { TextInput } from '@xrift/world-components';

<TextInput
  id="my-input"
  value={inputValue}
  onSubmit={handleSubmit}
  placeholder="テキストを入力..."
>
  <mesh>
    <boxGeometry args={[1, 0.5, 0.1]} />
    <meshStandardMaterial color="#333" />
  </mesh>
</TextInput>
Props
| Prop | Type | Default | Description |
|---|---|---|---|
id | string | - | 入力フィールドの一意なID(必須) |
children | ReactNode | - | 3Dオブジェクト(外観)(必須) |
placeholder | string | - | プレースホルダーテキスト |
maxLength | number | - | 最大文字数 |
value | string | - | 現在の値 |
onSubmit | (value: string) => void | - | 入力完了時のコールバック |
interactionText | string | 'クリックして入力' | インタラクション時に表示するテキスト |
disabled | boolean | false | 入力を無効にするか |
仕組み
TextInput コンポーネントは以下のアーキテクチャで動作します:
- TextInput: children として渡された3Dオブジェクトをクリック可能な入力フィールドとして表示
- オーバーレイ入力: クリック時に2Dのテキスト入力UIがオーバーレイとして表示され、実際の入力を受け付けます
- XRiftContext連携: world-componentsはXRiftContext経由でオーバーレイ表示をリクエストします
children に任意の3Dオブジェクトを渡すことで、入力フィールドの外観を自由にカスタマイズできます。ボタン風のデザインや、ワールドの世界観に合わせた見た目を実現できます。
プラットフォーム側では以下のAPIを使用してTextInputの動作を実装しています:
TextInputContextuseTextInputContextTextInputContextValueTextInputRequest
TagBoard
ユーザーが選択したタグをローカル/グローバルに扱い、ボードUI(TagSelector)と各ユーザー頭上へのタグ表示(TagDisplay)を提供するコンポーネントです。
import { TagBoard } from '@xrift/world-components';

<TagBoard
  instanceStateKey="main-tag-board"
  position={[0, 1.5, -3]}
/>
Props
| Prop | Type | Default | Description |
|---|---|---|---|
tags | Tag[] | デフォルトタグ一覧 | 表示・選択対象のタグ |
columns | number | 3 | 表示列数 |
title | string | "タグ選択" | タイトル文言 |
instanceStateKey | string | - | インスタンス状態のキー(必須、複数ボード設置時の識別用) |
position | [number, number, number] | [0, 0, 0] | ボードの位置 |
rotation | [number, number, number] | [0, 0, 0] | ボードの回転 |
scale | number | 1 | 全体スケール |
Tag 型定義
interface Tag {
  id: string;      // タグの一意識別子
  label: string;   // 表示ラベル
  color: string;   // 色(HEX形式)
}
デフォルトタグ一覧
tags プロパティを省略した場合、以下のタグが使用されます:
[
  { color: "#2ECC71", id: "want-talk", label: "話したい" },
  { color: "#3498DB", id: "want-listen", label: "聞きたい" },
  { color: "#95A5A6", id: "silent", label: "無言" },
  { color: "#1ABC9C", id: "developer", label: "開発者" },
  { color: "#2980B9", id: "student", label: "学生" },
  { color: "#F1C40F", id: "beginner", label: "初心者" },
  { color: "#9B59B6", id: "dont-know", label: "なんもわからん" },
  { color: "#8BC34A", id: "working", label: "作業中" },
  { color: "#BF7B41", id: "away", label: "離席中" },
  { color: "#FF9800", id: "cat", label: "ねこ" },
]
使用例
カスタムタグを使用
import { TagBoard, type Tag } from '@xrift/world-components';

const customTags: Tag[] = [
  { id: "frontend", label: "フロントエンド", color: "#61DAFB" },
  { id: "backend", label: "バックエンド", color: "#68A063" },
  { id: "design", label: "デザイン", color: "#FF6B6B" },
  { id: "pm", label: "PM", color: "#9B59B6" },
];

export const MyWorld = () => {
  return (
    <TagBoard
      tags={customTags}
      columns={2}
      title="あなたの役割は?"
      instanceStateKey="role-tag-board"
      position={[0, 1.5, -3]}
      rotation={[0, 0, 0]}
      scale={1.2}
    />
  );
};
instanceStateKey は同一ワールド内で一意である必要があります。複数の TagBoard を設置する場合は、それぞれ異なる instanceStateKey を指定してください。
UsersContextが必要です(ユーザー情報の取得に使用)- 内部で
useInstanceStateフックを使用しています(タグ選択状態の同期)
DevEnvironment
ローカル開発用の環境を提供するコンポーネントです。ワールドテンプレートの dev.tsx で使用します。
このコンポーネントはワールド開発プロジェクトで npm run dev を実行した際のローカル確認用です。World.tsx などの実際のワールドコンテンツ内では使用しないでください。
import { DevEnvironment, XRiftProvider } from '@xrift/world-components'
import { World } from './World'
import xriftConfig from '../xrift.json'

createRoot(rootElement).render(
  <StrictMode>
    <XRiftProvider baseUrl="/">
      <DevEnvironment
        physicsConfig={xriftConfig.world?.physics}
        camera={{ near: xriftConfig.world?.camera?.near, far: xriftConfig.world?.camera?.far }}
      >
        <World />
      </DevEnvironment>
    </XRiftProvider>
  </StrictMode>
)
Props
| Prop | Type | Default | Description |
|---|---|---|---|
children | ReactNode | - | ワールドコンテンツ(必須) |
camera | { position?: [x, y, z]; fov?: number; near?: number; far?: number } | { fov: 50, near: 0.01, far: 1000 } | カメラ設定 |
moveSpeed | number | 5.0 | 移動速度 |
shadows | boolean | true | シャドウの有効/無効 |
spawnPosition | [x, y, z] | [0.11, 1.6, 7.59] | スポーン位置 |
respawnThreshold | number | -10 | リスポーンのY座標閾値 |
physicsConfig | PhysicsConfig | - | 物理設定 |
CameraConfig
camera prop で設定可能なクリッピング距離です。xrift.json の world.camera 設定と対応しています。
| Prop | Type | Default | Description |
|---|---|---|---|
near | number | 0.01 | nearクリッピング距離 |
far | number | 1000 | farクリッピング距離 |
PhysicsConfig
| Prop | Type | Default | Description |
|---|---|---|---|
gravity | number | 9.81 | 重力加速度 |
allowInfiniteJump | boolean | true | 無限ジャンプの許可 |
提供する機能
- ファーストパーソンプレイヤー: 物理ベースのWASD移動・ジャンプ・リスポーン
- 視点操作: PointerLockControls による視点操作
- インタラクション: INTERACTABLE レイヤーへのレイキャスト + クリックインタラクション
- クロスヘアUI: 画面中央のクロスヘア(ヒット時ハイライト)
- 案内UI: ポインターロック状態の案内UI
- 操作説明UI: 操作方法を表示するUI
操作方法
| 操作 | 説明 |
|---|---|
| クリック | ポインターロック開始 / インタラクト |
| WASD / 矢印キー | 移動 |
| Space / E | ジャンプ |
| ESC | ポインターロック解除 |
@react-three/rapier(^2.0.0)のインストールが必要です(optional peerDependency)。
Portal
他のインスタンスへの移動ポータルを表示するコンポーネントです。渦巻きシェーダーエフェクト、移動先のサムネイル・ワールド名・インスタンス名・人数、パーティクル、グロー、クリック可能な台座で構成されます。
instanceId を指定すると、対象インスタンスの情報を自動取得して表示します。台座をクリックすると確認モーダル(useConfirm)を経て対象インスタンスへ遷移します。
import { Portal } from '@xrift/world-components'

function MyWorld() {
  return (
    <Portal
      instanceId="ceffb128-23c7-4120-b4e6-19bf6c604c47"
      position={[5, 0, 0]}
      rotation={[0, Math.PI / 2, 0]}
    />
  )
}
Props
| Prop | Type | Default | Description |
|---|---|---|---|
instanceId | string | - | 移動先のインスタンスID(必須) |
position | [number, number, number] | [0, 0, 0] | ポータルの座標 |
rotation | [number, number, number] | [0, 0, 0] | ポータルの回転 |
インスタンスIDはインスタンスページのURLに含まれる UUID です。例えば https://app.xrift.net/instance/ceffb128-23c7-4120-b4e6-19bf6c604c47 の場合、ceffb128-23c7-4120-b4e6-19bf6c604c47 がインスタンスIDです。
Portal は内部で useInstance フックを使用してインスタンス情報の取得と遷移を行っています。
BillboardY
子要素をカメラに対してY軸回転のみで追従させるコンポーネントです。drei の <Billboard> は全軸で回転しますが、BillboardY はY軸のみ回転するため「上方向」が維持されます。炎、パーティクル、ネームプレート、看板などに最適です。
Mirror(Reflector)と併用しても、鏡の中で正しい向きで表示されます。
import { BillboardY } from '@xrift/world-components'

function NamePlate() {
  return (
    <BillboardY position={[0, 2, 0]}>
      <mesh>
        <planeGeometry args={[2, 0.5]} />
        <meshStandardMaterial color="#333" />
      </mesh>
    </BillboardY>
  )
}
Props
<group> と同じ Props を受け取ります(position, rotation, scale など)。
useBillboardY フックを使うと、任意の Object3D に対してY軸ビルボードを適用できます。詳しくはuseBillboardYを参照してください。
フック
useInstanceState
インスタンス内の全ユーザー間で状態を同期します。React の useState と同じインターフェースです。
import { useInstanceState } from '@xrift/world-components';

function Counter() {
  const [count, setCount] = useInstanceState('counter', 0);

  return (
    <mesh onClick={() => setCount(count + 1)}>
      {/* count は全ユーザーで同期される */}
    </mesh>
  );
}
引数
| 引数 | Type | Description |
|---|---|---|
key | string | 状態の一意な識別子 |
initialValue | T | 初期値 |
戻り値
[value: T, setValue: (newValue: T) => void] - useState と同じ形式
useInstanceEvent
インスタンスイベントの送受信を行うフックです。プラットフォームイベント(user-joined, user-left)の受信や、ワールド独自のカスタムイベントの送受信ができます。
import { useInstanceEvent } from '@xrift/world-components';

// プラットフォームイベントの受信(受信のみ、emit 不可)
useInstanceEvent('user-joined', (data) => {
  console.log('User joined:', data)
})

// カスタムイベントの送受信
const emitReaction = useInstanceEvent('reaction', (data) => {
  console.log('Reaction received:', data)
})
emitReaction({ emoji: '👍', userId: 'user-1' })
引数
| 引数 | Type | Description |
|---|---|---|
eventName | string | イベント名 |
callback | (data: T) => void | イベント受信時のコールバック |
戻り値
(data: T) => void - イベント送信関数。プラットフォーム予約イベント(user-joined, user-left)の場合は no-op になります。
イベントの種類
| 種類 | イベント名 | 送信 | 受信 | 説明 |
|---|---|---|---|---|
| プラットフォーム | user-joined | - | ✅ | ユーザーがインスタンスに入室 |
| プラットフォーム | user-left | - | ✅ | ユーザーがインスタンスから退室 |
| カスタム | 任意の文字列 | ✅ | ✅ | ワールド独自のイベント |
ユースケース
リアクション機能
import { useInstanceEvent } from '@xrift/world-components';
import { useCallback, useState } from 'react';

function ReactionSystem() {
  const [reactions, setReactions] = useState<{ emoji: string }[]>([]);

  const emitReaction = useInstanceEvent('reaction', (data: { emoji: string }) => {
    setReactions(prev => [...prev, data]);
  });

  const sendReaction = useCallback((emoji: string) => {
    emitReaction({ emoji });
  }, [emitReaction]);

  return (
    <mesh onClick={() => sendReaction('👍')}>
      <boxGeometry args={[1, 1, 0.2]} />
      <meshStandardMaterial color="yellow" />
    </mesh>
  );
}
入退室の検知
import { useInstanceEvent } from '@xrift/world-components';

function JoinLeaveNotifier() {
  useInstanceEvent('user-joined', (data) => {
    console.log('User joined:', data);
  });

  useInstanceEvent('user-left', (data) => {
    console.log('User left:', data);
  });

  return null;
}
- useInstanceEvent: 一時的なイベント通知(リアクション、エフェクトトリガーなど)に適しています。
- useInstanceState: 永続的な同期状態(カウンター、ON/OFF状態など)に適しています。
開発環境ではローカル EventEmitter が使用されるため、同一ブラウザ内でのみイベントが送受信されます。本番環境ではプラットフォームが WebSocket 実装を注入し、インスタンス内の全ユーザー間でイベントが共有されます。
useScreenShareContext
画面共有の状態を取得するフックです。
import { useScreenShareContext } from '@xrift/world-components';

function MyComponent() {
  const { videoElement, isSharing, startScreenShare, stopScreenShare } = useScreenShareContext();

  return (
    <button onClick={isSharing ? stopScreenShare : startScreenShare}>
      {isSharing ? '共有を停止' : '共有を開始'}
    </button>
  );
}
戻り値
| Property | Type | Description |
|---|---|---|
videoElement | HTMLVideoElement | null | 表示する映像のvideo要素 |
isSharing | boolean | 自分が共有中かどうか |
startScreenShare | () => void | 共有開始 |
stopScreenShare | () => void | 共有停止 |
useSpawnPoint
プラットフォーム側がスポーン地点情報を取得するためのフックです。
import { useSpawnPoint } from '@xrift/world-components';

function MyPlatform() {
  const spawnPoint = useSpawnPoint();
  // spawnPoint: { position: [x, y, z], yaw: number }
}
戻り値
| Property | Type | Description |
|---|---|---|
position | [number, number, number] | スポーン位置 |
yaw | number | スポーン時の向き(度数法) |
このフックは xrift-frontend(プラットフォーム)側での使用を想定しています。ワールド開発者は SpawnPoint コンポーネントを使用してください。
useUsers
ワールドに参加しているユーザー情報と位置情報を取得するフックです。自分自身(ローカルユーザー)と他の参加者(リモートユーザー)の情報にアクセスできます。
import { useUsers } from '@xrift/world-components';

function ParticipantCount() {
  const { localUser, remoteUsers, getMovement, getLocalMovement } = useUsers();

  const totalCount = (localUser ? 1 : 0) + remoteUsers.length;

  return (
    <div>
      <p>参加者数: {totalCount}人</p>
    </div>
  );
}
戻り値
| Property | Type | Description |
|---|---|---|
localUser | User | null | 自分自身のユーザー情報 |
remoteUsers | User[] | 他の参加者のユーザー情報の配列 |
getMovement | (id: string) => PlayerMovement | undefined | 指定ユーザーの位置情報を取得 |
getLocalMovement | () => PlayerMovement | 自分の位置情報を取得 |
User 型
interface User {
  id: string;              // ユーザーID
  displayName: string;     // 表示名
  userIconUrl: string | null; // アバターアイコンURL
  isGuest: boolean;        // ゲストかどうか
}
PlayerMovement 型
interface PlayerMovement {
  position: { x: number; y: number; z: number };
  direction: { x: number; z: number };
  horizontalSpeed: number;
  verticalSpeed: number;
  rotation: { yaw: number; pitch: number };
  isGrounded: boolean;
  isJumping: boolean;
  isInVR?: boolean;
  vrTracking?: VRTrackingData;
}
useFrame 内での位置情報取得
getMovement() と getLocalMovement() は useFrame 内で毎フレーム呼び出すことができます。これらの関数は再レンダリングを発生させずに最新の位置情報を取得できます。
import { useUsers } from '@xrift/world-components';
import { useFrame } from '@react-three/fiber';
import { useRef } from 'react';
import { Group } from 'three';

function FollowCamera() {
  const groupRef = useRef<Group>(null);
  const { getLocalMovement } = useUsers();

  useFrame(() => {
    const movement = getLocalMovement();
    if (!groupRef.current) return;

    // 自分の位置の少し上にオブジェクトを配置
    groupRef.current.position.set(
      movement.position.x,
      movement.position.y + 3,
      movement.position.z
    );
  });

  return (
    <group ref={groupRef}>
      <pointLight intensity={1} />
    </group>
  );
}
ユースケース
ユーザーの頭上にHUDを表示
import { useUsers } from '@xrift/world-components';
import { useFrame } from '@react-three/fiber';
import { useRef } from 'react';
import { Group } from 'three';
import { Text } from '@react-three/drei';

function UserHUD({ user, getMovement }) {
  const groupRef = useRef<Group>(null);

  useFrame(() => {
    const movement = getMovement(user.id);
    if (!movement || !groupRef.current) return;

    // ユーザーの頭の上に配置
    groupRef.current.position.set(
      movement.position.x,
      movement.position.y + 2,
      movement.position.z
    );
  });

  return (
    <group ref={groupRef}>
      <Text fontSize={0.2}>{user.displayName}</Text>
    </group>
  );
}

function UserHUDs() {
  const { remoteUsers, getMovement } = useUsers();

  return (
    <>
      {remoteUsers.map(user => (
        <UserHUD key={user.id} user={user} getMovement={getMovement} />
      ))}
    </>
  );
}
近くにいるユーザーを検出
import { useUsers } from '@xrift/world-components';
import { useFrame } from '@react-three/fiber';
import { useState } from 'react';

function ProximityDetector() {
  const { remoteUsers, getMovement, getLocalMovement } = useUsers();
  const [nearbyUsers, setNearbyUsers] = useState<string[]>([]);

  useFrame(() => {
    const myPos = getLocalMovement().position;
    const nearby: string[] = [];

    remoteUsers.forEach(user => {
      const movement = getMovement(user.id);
      if (!movement) return;

      const distance = Math.sqrt(
        Math.pow(myPos.x - movement.position.x, 2) +
        Math.pow(myPos.y - movement.position.y, 2) +
        Math.pow(myPos.z - movement.position.z, 2)
      );

      if (distance < 5) {
        nearby.push(user.displayName);
      }
    });

    // 配列の内容が変わった場合のみ更新
    if (JSON.stringify(nearby) !== JSON.stringify(nearbyUsers)) {
      setNearbyUsers(nearby);
    }
  });

  return null;
}
ユーザー間の距離を計算
import { useUsers } from '@xrift/world-components';
import { useFrame } from '@react-three/fiber';
import { useRef } from 'react';
import { Line } from '@react-three/drei';

function DistanceLine({ targetUser, getMovement, getLocalMovement }) {
  const lineRef = useRef<any>(null);

  useFrame(() => {
    const myPos = getLocalMovement().position;
    const targetMovement = getMovement(targetUser.id);
    if (!targetMovement || !lineRef.current) return;

    lineRef.current.geometry.setPositions([
      myPos.x, myPos.y + 1, myPos.z,
      targetMovement.position.x, targetMovement.position.y + 1, targetMovement.position.z
    ]);
  });

  return (
    <Line
      ref={lineRef}
      points={[[0, 0, 0], [0, 0, 0]]}
      color="yellow"
      lineWidth={2}
    />
  );
}
getMovement() と getLocalMovement() は useFrame 内で毎フレーム呼び出しても問題ありません。これらは内部的にキャッシュされた値を返すため、パフォーマンスへの影響は最小限です。
remoteUsers 配列はユーザーの参加/離脱時のみ更新されます。ユーザーの位置情報の変化では再レンダリングは発生しません。位置情報は常に getMovement() を使用して取得してください。
useTeleport
自分自身のアバターを指定した座標に瞬間移動させるフックです。ポータル、エレベーター、ワープゾーンなどのユースケースに対応します。
import { useTeleport } from '@xrift/world-components';

function MyComponent() {
  const { teleport } = useTeleport();

  const handleTeleport = useCallback(() => {
    teleport({ position: [50, 0, 30], yaw: 180 });
  }, [teleport]);
}
API
interface TeleportDestination {
  position: [number, number, number]
  yaw?: number // 度数法(0-360)省略時は現在の向きを維持
}

const { teleport } = useTeleport()
パラメータ(TeleportDestination)
| パラメータ | 型 | 必須 | 説明 |
|---|---|---|---|
position | [number, number, number] | Yes | テレポート先の座標 [x, y, z] |
yaw | number | No | テレポート後の向き(度数法 0-360)。省略時は現在の向きを維持 |
使用例
ポータルでテレポート
import { useTeleport, Interactable } from '@xrift/world-components'
import { useCallback } from 'react'

function MyWorld() {
  const { teleport } = useTeleport()

  const handlePortal = useCallback(() => {
    teleport({ position: [50, 0, 30], yaw: 180 })
  }, [teleport])

  return (
    <Interactable id="portal" onInteract={handlePortal}>
      <mesh>
        <torusGeometry />
        <meshStandardMaterial color="purple" />
      </mesh>
    </Interactable>
  )
}
yaw を省略するとテレポート後もプレイヤーの現在の向きが維持されます。特定の方向を向かせたい場合のみ指定してください。
useConfirm
ユーザーに確認モーダルを表示するフックです。ワールド移動など重要なアクションの前に確認を求めることができます。
import { useConfirm } from '@xrift/world-components';

function MyComponent() {
  const { requestConfirm } = useConfirm();

  const handleAction = async () => {
    const ok = await requestConfirm({ message: 'ワールドを移動しますか?' });
    if (ok) {
      // 確認された場合の処理
    }
  };
}
戻り値
| Property | Type | Description |
|---|---|---|
requestConfirm | (options: ConfirmOptions) => Promise<boolean> | 確認モーダルを表示し、結果を返す |
ConfirmOptions
| Property | Type | 必須 | Description |
|---|---|---|---|
message | string | Yes | ユーザーに表示するメッセージ |
title | string | No | ダイアログのタイトル |
confirmLabel | string | No | 確認ボタンのラベル |
cancelLabel | string | No | キャンセルボタンのラベル |
使用例
外部サイトへの遷移前に確認
import { useConfirm, Interactable } from '@xrift/world-components'

function ExternalLink() {
  const { requestConfirm } = useConfirm()

  const handleClick = async () => {
    const ok = await requestConfirm({
      title: '外部サイトへ移動',
      message: '外部サイトへ移動します。よろしいですか?',
      confirmLabel: '移動する',
      cancelLabel: 'キャンセル',
    })
    if (ok) {
      window.open('https://example.com', '_blank')
    }
  }

  return (
    <Interactable id="external-link" onInteract={handleClick}>
      <mesh>
        <boxGeometry args={[1, 1, 0.2]} />
        <meshStandardMaterial color="cyan" />
      </mesh>
    </Interactable>
  )
}
iPhone 等のモバイルブラウザでは、ユーザー操作を起点としない window.open や外部サイトへの遷移がブロックされます。useConfirm で確認ダイアログを挟むことで、ユーザー操作起点のイベントチェーンを作り、ブラウザのポップアップブロックを回避できます。
Portal コンポーネントは内部で useInstance フックを経由して useConfirm を使用しています。Portal を使う場合は useConfirm を直接呼ぶ必要はありません。
useInstance
インスタンス情報の取得と確認付き遷移を提供するフックです。内部で useConfirm を使い、遷移前に確認モーダルを表示します。
import { useInstance } from '@xrift/world-components'

function MyComponent() {
  const { info, navigateWithConfirm } = useInstance('target-instance-id')

  if (!info) return null

  return (
    <mesh onClick={navigateWithConfirm}>
      {/* インスタンス名: {info.name} */}
    </mesh>
  )
}
引数
| 引数 | Type | Description |
|---|---|---|
instanceId | string | 取得するインスタンスのID |
戻り値
| Property | Type | Description |
|---|---|---|
info | InstanceInfo | null | インスタンス情報(取得前は null) |
navigateWithConfirm | () => Promise<void> | 確認モーダル付きでインスタンスへ遷移 |
InstanceInfo 型
| フィールド | Type | Description |
|---|---|---|
id | string | インスタンスID |
name | string | インスタンス名 |
description | string | null | 説明 |
currentUsers | number | 現在のユーザー数 |
maxCapacity | number | 最大収容人数 |
isPublic | boolean | 公開かどうか |
allowGuests | boolean | ゲスト許可 |
owner | { id, displayName, userIconUrl? } | オーナー情報(任意) |
world | WorldInfo | 所属ワールドの情報 |
useWorld
ワールド情報の取得を提供するフックです。
import { useWorld } from '@xrift/world-components'

function MyComponent() {
  const { info } = useWorld('target-world-id')

  if (!info) return null

  return (
    <mesh>
      {/* ワールド名: {info.name} */}
    </mesh>
  )
}
引数
| 引数 | Type | Description |
|---|---|---|
worldId | string | 取得するワールドのID |
戻り値
| Property | Type | Description |
|---|---|---|
info | WorldInfo | null | ワールド情報(取得前は null) |
WorldInfo 型
| フィールド | Type | Description |
|---|---|---|
id | string | ワールドID |
name | string | ワールド名 |
description | string | null | 説明 |
thumbnailUrl | string | null | サムネイルURL |
isPublic | boolean | 公開かどうか |
instanceCount | number | インスタンス数 |
totalVisitCount | number | 総訪問数 |
uniqueVisitorCount | number | ユニーク訪問者数 |
favoriteCount | number | お気に入り数 |
owner | { id, displayName, userIconUrl? } | オーナー情報(任意) |
permissions | { allowedDomains: string[], allowedCodeRules: string[] } | undefined | ワールドが必要とする権限(詳細) |
useBillboardY
対象の Object3D を毎フレームカメラに向けてY軸のみ回転させるフックです。BillboardY コンポーネントの内部で使用されていますが、任意の Object3D に適用したい場合に直接使えます。
内部では sentinel Mesh の onBeforeRender を使用しているため、Mirror(Reflector)の virtualCamera でも正しい回転が適用されます。
import { useBillboardY } from '@xrift/world-components'
import type { Group } from 'three'

function CustomBillboard() {
  const ref = useBillboardY<Group>()

  return (
    <group ref={ref}>
      <mesh>
        <planeGeometry args={[1, 1.5]} />
        <meshBasicMaterial map={fireTexture} />
      </mesh>
    </group>
  )
}
戻り値
| Property | Type | Description |
|---|---|---|
ref | RefObject<T> | 対象の Object3D にアタッチする ref |
関連
BillboardYコンポーネント — このフックを<group>でラップしたものgetBillboardYRotation(cameraWorldPos, targetWorldPos)— 回転角度を計算する純粋関数(InstancedMesh などで手動計算する場合に使用)
定数
LAYERS
Three.js のレイヤーシステムを活用した定数です。カメラやRaycasterのレイヤー設定に使用します。
import { LAYERS } from '@xrift/world-components';
| 定数名 | 値 | 説明 |
|---|---|---|
LAYERS.DEFAULT | 0 | デフォルトレイヤー(すべてのオブジェクトが初期状態で属する) |
LAYERS.FIRST_PERSON_ONLY | 9 | 一人称視点のみ表示(VRMFirstPerson用) |
LAYERS.THIRD_PERSON_ONLY | 10 | 三人称視点のみ表示(VRMFirstPerson用) |
LAYERS.INTERACTABLE | 11 | インタラクト可能オブジェクト(Raycast対象) |
関連する型
type LayerName = 'DEFAULT' | 'FIRST_PERSON_ONLY' | 'THIRD_PERSON_ONLY' | 'INTERACTABLE';
type LayerNumber = 0 | 9 | 10 | 11;
ユースケース
- Raycasterでインタラクション対象を検出する際のレイヤー設定
- VRモードでの一人称/三人称の表示切り替え